From the Recipe Box: French Onion Soup.

Soup is one of the easiest things to make, but often because of a demanding lifestyle we can’t make it from scratch.

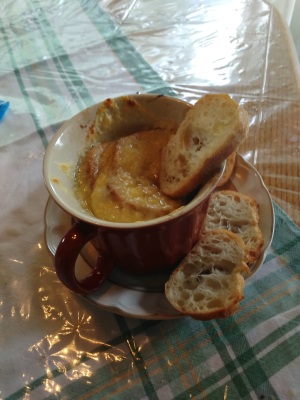
French Onion soup is one of those dishes that demand your attention. You can’t just throw everything into a pot and have at it, the beginning – and the most important part – caramelising the onions is time consuming but if you want to get it right it needs all your attention. This is also one of those dishes where ingredients are everything. Some dishes you can substitute one thing for another, but sometimes you just have to follow the recipe to get the best result. Case in point, I could have used the onions that were already in the fridge (yellow), but for this soup I would suggest you use Vidalia. When caramelising you want your onions to be blonde, and these are perfect. The good thing is, once the carmaelisation is done you can relax, so if you’ve got about an hour to spare try this recipe on for size.

[Three Kinds of Caramelised Onions] 

You can put whatever cheese you wish on top. Most recipes I found called for Mozzarella (mild flavour) but I used Swiss and Parmesan that the recipe called for. If you want authentic, then use aged Gruyère.

I found the recipe I made HERE.

Ingredients:

  • 2 tablespoons unsalted butter
  • 2 large onions halved and thinly sliced
  • 1/2 teaspoon salt
  • 1/2 teaspoon brown sugar
  • 4 cups beef broth**(1)
  • 2 tablespoons white wine **(2)
  • 2 teaspoons Worcestershire sauce
  • 1/2 teaspoon dried thyme leaves
  • 1 bay leaf
  • 2 teaspoons balsamic vinegar
  •  salt to taste
  •  black pepper to taste
  • 1/4 cup shredded parmesan divided
  • 2 baguette slices toasted
  • 4 slices Swiss cheese

French onion soup

Instructions

  1. Melt butter in a large pot over medium heat.
  2. Stir in onions, salt, and sugar. Cook 35 minutes, over medium/medium low, stirring frequently, until onions are caramelized.
  3. Mix beef broth, white wine, Worcestershire sauce, thyme, and bay leaf into pot.
  4. Simmer over medium heat for 20 minutes, stirring occasionally.
  5. Remove and discard the bay leaf.
  6. Mix in vinegar and season with salt and pepper.
  7. Place oven safe soup bowls on a rimmed baking sheet. Fill bowls with soup. Top each bowl evenly with parmesan, bread, and swiss cheese.
  8. Broil until bubbly.
  9. Serve immediately!

For a truly authentic French Onion soup, I found this recipe. http://www.epicurious.com/recipes/member/views/authentic-soupe-a-l-oignon-gratinee-french-onion-soup-52847591

I used regular butter as opposed to un-salted but didn’t add any extra salt, and I found it still quite salty. Probably because of the store-bought broth. Next time I’ll use unsalted butter and low-sodium broth, but home-made would be best. I didn’t add the wine either. With such a small amount mixed with Worcestershire and balsamic vinegar, I doubted I would even taste it.

Have you made this soup before? How did it work out for you?


From the Recipe Box: The Monty Cristo Sandwich

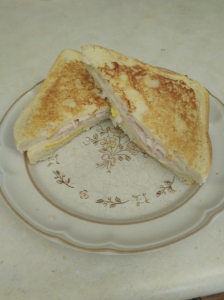
Sithboy fell in love with this sandwich and I had to learn how to make it. First, some history: it’s believed that this sandwich derived from the French dish Croque Monsieur (which is an awesome dish in itself) and could be considered the origin of the grilled cheese sandwich we know now.  The version I made is quick and easy and based on how the restaurant we visit prepares the meal. It’s quite filling and I’ve added a few personal touches just to make it interesting.


1

Ingredients:

Shaved ham

Shaved turkey

Sliced Swiss cheese (two slices per sandwich)

Bread

One egg

1/4 cup milk

2 tbsp. maple syrup (NOT table syrup)

Mustard

Mayonnaise

Instructions:

Warm frypan on med/low heat.

Mix egg, milk and maple syrup. Wash one side of bread with egg wash and place on frypan.

Apply mustard.

Place one slice of cheese on the bread followed by some ham, turkey a second slice of cheese and another egg washed slice of bread with mayo on the opposite side.

Fry for 2-3 minutes and carefully flip and fry for another 2-3 minutes. Most places use a panini press which is a good idea. Saves from having to flip. The maple syrup is optional. While you can’t taste it in the sandwich, you get a hint of it flavour as you bite into it.

8

From the Recipe Box: Gluten-Free Cream of Turkey Soup.

I don’t use buzzwords without a good reason. Yes, this soup is gluten-free because I didn’t use flour to thicken. It’s a new trend I’m on and so far it’s been a success. Wait until I give you the recipe for home-made scalloped potatoes. First off, here is the link to the original recipe.

https://www.dairygoodness.ca/recipes/cream-of-turkey-soup

It’s really good, but what surprised me at first was the addition of cream, and a heavy cream at that. Yes, it will have more calories or and fat, but do you understand the process manufactures’ put whole food through to make it ‘healthy’? When they take out fat, they add sodium; fat is what gives some food it’s taste. Next time you see something that should have fat but doesn’t, think about what they’ve put in to make it palatable. Especially dairy, but I’m going off topic here . . .

Here is my take on the same recipe. Everything is the same with the exception of one ingredient (okay two; I added potatoes) – instead of corn starch, use potato starch. *maniacal laugh*

2 tbsp (30 mL) butter

8 oz (250 mL) cooked chopped turkey

1 onion, finely chopped

1 cup (250 mL) diced carrot

1 cup (250 mL) diced celery

1 cup (250 mL) frozen peas

1 tsp (5 mL) dried thyme

1 tsp (5 mL) dried marjoram

1/2 tsp (2 mL) salt

1/2 tsp (2 mL) pepper

2 cups diced potatoes

2 1/4 cups (560 mL) chicken stock

2 tbsp (30 mL) potato starch

1 1/2 cups (375 mL) 35 % cream

Heat butter in large saucepan over medium heat. Add turkey, onions, carrots and celery; cook for 3 to 5 min or until onion is softened. Add peas, seasonings and chicken stock; bring to boil, cover and simmer for 15 min.

Mix potato starch in 1/4 cup (60 mL) of cream until mixture is smooth. Start with one tbsp at a time and be careful as it will thicken up quickly. Add the mixture to soup with remaining cream. Bring to boil, stirring continuously until mixture has thickened.

**I added the diced potato with the rest of the veggies but they were still kind of hard when the soup was complete even after cooking for the specific amount of time. I will cook them a bit next time and then add them to the recipe.**

From the Recipe Box: Cottage Pie Stuffed Potatoes

First, let me explain something. When I say Cottage Pie some people know it as Shepard’s Pie, but it isn’t. Shepard’s Pie is made with lamb not hamburger, so if you’ve been making this dish and calling it wrong, that’s okay, so was I until Husband went searching for the difference. You can use this recipe for either dish too as the only difference is the meat.

The recipe I went by is HERE.

You can find the original recipe HERE.

cottagepie6

Cottage Pie Stuffed Baked Potato

Ingredients:

Baked Potato Topping

– 4 large russet potatoes, scrubbed clean

– ¼ to ½ cup whole milk

– 2-½ tablespoons butter

– ½ teaspoon salt

Filling

– 1 tablespoon olive oil

– ½ medium onion, diced

– 8 ounces ground beef

– 2 tablespoons flour

– 1 cup beef broth

– 2 teaspoons Worcestershire sauce

– 1-½ teaspoons salt

– ¾ teaspoon black pepper

– 1-½ cups frozen vegetables


Instructions:

See either link.

My Notes:

The link is to the ORIGINAL recipe is a better recipe. The one I went by is an adaptation and while it does turn out well, it calls for herbs which give more taste to the filling. Also, if you’re gluten sensitive try using potato starch instead of flour for the sauce. I didn’t and the potatoes were somewhat sloppy, as you can tell from the photo. I also cheated and used a Shepard’s Pie mix from Club House because I find many home-made sauce recipes for the filling don’t have the same flavour.

If you use large potatoes, adjust your cooking time for them. Both recipes call to microwave, but I dislike using the machine for that. I use the microwave for re-heating and melting butter. Period. I used large Russett potatoes which took a good ninety minutes to cook all the way through and I let them sit for thirty minutes to cool. You have to pop everything back into the oven at the end, so don’t burn your hands scooping out the pulp. Even a little warm, the butter will melt, or melt it a bit before you add it. That’s what I did.

The Recipe Box: Pizza Stuffed Chicken

I KNOW! I thought the same thing when I saw the recipe. Turns out, it’s pretty damn awesome! It’s pretty simple too, and it makes for a great way to spice up chicken breasts.

Ingredients:

4 skinless chicken breasts

Mozzarella cheese

Pizza sauce.

Sliced pepperoni


Instructions:

  1. Pre-heat over to 375F.
  2. When chicken is thawed, take a knife and slice a pocket into the side of the breast.
  3. Pour some pizza sauce into the pocket first, followed by small slices of mozzarella cheese, and then the pepperoni. It’s best to use the pre-sliced pepperoni as it’s just the right thickness. Add desired seasoning.
  4. Place the chicken in a baking dish and brush with olive oil and seasoning of pepper oregano and salt (optional).
  5. Bake for 25 to 30 minutes. It shouldn’t take longer than the required time as the breasts are open and exposed to the heat.

img_20170115_153308

Original recipe can be found here, along with a video.

Pizza Stuffed Chicken

Result:

This was as easy to put together as the video shows, but for me it was sloppy as hell. The pockets weren’t that deep because of the size of the breast so I put some cheese and pepperoni on top. My advice, do it. Adds more flavour to the dinner as you don’t get enough of the pizza without it. I had to cook it longer than the 30 minutes. Come on, I don’t even cook normal chicken breasts for 30 minutes. 45 minutes is the magic number. Also if you’re not a fan of, or don’t have any fresh basil, sprinkle Italian seasoning on top. Again, adds flavour.

This is how mine turned out. I served it with rice and veggies.

The Recipe Box: Stuffed Baked Peppers

recipeboxOh my. I can see this being a regular on my dinner menu.

Only recently I’ve liked peppers of any colour. I always found them too hot to eat raw and didn’t always care for the taste of them on pizza (the only time I ever ate them cooked), but over the last few years, my taste buds have changed and now I can eat them both ways, but I prefer cooked. I find the flavour comes out more. Maybe it’s just me. Anyhoo…I’ve seen pictures of stuffed peppers and I finally decided to try them. There’s a little preparing ahead of the stuffing, but the prep time is nominal.

Ingredients:

4 to 6 large peppers (your choice of colour)

1 lb of lean ground beef

1 can diced tomatoes (I used Unico’s herbed diced tomatoes)

3 tbsp. Worcestershire

1 ½ cups rice

¼ tsp garlic powder

¼ tsp onion powder

¾ cup shredded cheese

Desired spices of your choice.

Salt (optional)

Directions:

  1. Pre-heat oven to 350.
  2. Cut peppers lengthwise and clean out pulp and seeds. Wrap each half in tin foil and place on baking sheet. Cook for 15 minutes. When they’re done, remove them from the foil to cool off.
  3. Cook hamburger in a deep skillet or fry pan. Drain off grease. Add can tomatoes, Worcestershire, garlic powder, onion powder, and spices. Mix.
  4. Add rice. Let sit for twenty minutes until the rice has absorbed most of the liquid.
  5. With a spoon, fill peppers with hamburger/rice. Depending on the size of your peppers, you might have some left over.
  6. Top with grated cheese.
  7. Place in pre-heated 350 degree oven and cook for 20 minutes.

IMG_20150527_173247Cooking the peppers a bit ahead of time cuts back on the overall cooking time for them. When doing some research on this recipe, I read some comments where people didn’t cook them a bit ahead of time and either left them in longer (and the hamburger/rice dried out/burnt) or the pepper wasn’t cooked enough. Baking them for a while not only keeps the shape, but you still get a bit of a crunch even after you’ve cooked them the second time. You can blanch the peppers instead of pre-cook as well. I think next time, I’ll cook them the second time on the barbeque.

The Recipe Box: Chicken Parmesan

recipeboxThis is a nice recipe to make. It looks fancy and difficult to make, but it’s really easy. I do mine differently than most recipes, because I have to watch for my husband’s diet. None the less, it will still turn out wonderful. This recipe is for two. I use as many home-made ingredients as I can. The sauce in these pictures was made with tomatoes, green peppers, onions and herbs from our garden.

Ingredients:

2 chicken breasts

3 teaspoons grated parmesan cheese

½ cup mozzarella cheese

1 cup Italian bread crumbs*

4 cups of spaghetti sauce

*Italian bread crumbs is just herbs and parmesan cheese mixed with the crumbs.IMG_20150218_181024

Instructions:

1. Preheat oven to 350 degrees

2. For even cooking, you should flatten the chicken as best as possible. Use a mallet or rolling pin to flatten. Bread chicken and place on cooking rack. For a good coating of crumbs, dip the chicken in an egg wash and then in the crumbs.

3. Put chicken in the oven and cook for 30 minutes.

4. Mix parmesan cheese and mozzeralla. I do this with my fingers to make sure it’s mixed good.

5. After 30 minutes, take the chicken out and spread sauce on top. Spread the cheese evenly on top and pop it back into the over for another 15 minutes.

6. Prepare spaghetti (or other side dish)

When the chicken is done, put some spaghetti on the plate, top with sauce and place a chicken on top. Serve.

The Recipe Box: Home-made Cream of Turkey Soup

recipeboxHappy New Year! I hope everyone had a great holiday season! Husband made WAY too much food, but what else is new. Just means MORE LEFTOVERS!

Last year, I made turkey pot pies with the leftovers but there was too much crust, so this year I made cream of turkey soup. The best thing about this is everything in the soup was homemade. Even the stock. This way, I could control the salt and leaving it out altogether.

If you’ve never made stock before, it’s easy. Just pick off as much of the meat as possible, then put the carcass in a large pot. A stock pot is preferred, but I used my spaghetti pot. Add five cups of water, two roughly chopped carrots and two chopped celery sticks, a chopped onion, a bay leaf and several stocks of parsley. Bring everything to a boil and then turn it down to med-low heat, and let everything boil for four hours. When the time is up, take some cheesecloth and place it over a large bowl and carefully pour the stock onto the cheesecloth. This will strain everything. Let it cool. Put the liquid in the fridge for 8 hours. As it cools, the fat will come to the surface and solidify. Scrape it off.

Or, you could use store-bought chicken or turkey stock. 😛

The link to the soup is at the bottom of the post. It was really simple. An interesting note, the recipe calls for milk, I put in cream. I used heavy cream because the higher the fat content in the liquid you use, the thicker the soup will be. Our soup was creamy, but I found it a little on the thin side, but Husband could only find cream that was %18.

http://www.food.com/recipe/creamy-turkey-soup-115086

What do you make with your leftovers? Any good recipes I can try for next year?

The Recipe Box: Home-made Cranberry Sauce

As Thanksgiving is quickly approaching for our neighbours to the South, I thought it would be a nice idea to share my home-made cranberry sauce. I found the recipe online, but tweaked it a bit. This recipe will make enough to last for several dinners, and is very, very favourable and aromatic.


Ingredients:

1 pound fresh cranberries, washed and dried (I used three small bags)

1 cup packed brown sugar

1 cut white sugar

1/3 cup water

½ teaspoon of ground cinnamon

½ teaspoon of allspice

¼ teaspoon ground nutmeg

1 orange, zested and juiced (use one that has a strong aroma)


Directions:

In a large pot, combine the cranberries, sugar and water. Stir to blend. Bring the mixture to a boil over medium heat. Reduce to a simmer and add cinnamon, allspice and nutmeg. Stir to blend and simmer for another 7 minutes. Some of the cranberries will burst and some will remain whole. Add the orange juice and zest. Stir. Allow to cool before serving.


This recipe can be made up the night before and put in the fridge.